Rxis
NEW trong Anime Studio Pro 11 – Frame-by-frame hoạt hình bây giờ là cuối cùng có thể có trong Anime Studio! Frame-by-Frame layer mới và điều khiển bổ sung cung cấp cho bạn nhiều năng lượng hơn trong việc tạo ra thực frame-by-frame hình ảnh động. Kết hợp với hoạt hình xương hoặc chuyển đổi giữa hai cho linh hoạt hơn.Cách tham khảo lớp
NEW trong Anime Studio Pro 11 – Bây giờ bạn có thể lặp lại các lớp trong khi duy trì một kết nối với bản gốc. Điều này cho phép cộng tác viên làm việc đồng thời trong khi dễ dàng cập nhật các thay đổi vào các giai đoạn tương ứng của các đường ống dẫn.Animated Shape Thứ tự
NEW trong Anime Studio Pro 11 – Dễ dàng thay đổi thứ tự của lớp hình dạng trong một lớp vector đơn theo thời gian loại bỏ sự cần thiết cho nhiều lớp. Điều này cho phép kiểm soát tốt hơn trong xây dựng và tương tác nhân vật trong phim hoạt hình.Animated tiêu xương
NEW trong Anime Studio Pro 11 – Bây giờ bạn có thể dễ dàng chuyển đổi từ một trong những mục tiêu xương khác khi làm việc với các mục tiêu xương động. Đối tượng hoạt hình nơi bàn giao xảy ra bây giờ dễ dàng hơn và mượt mà hơn bao giờ hết.Animated Bone Nuôi dạy con
NEW trong Anime Studio Pro 11 – Bây giờ bạn có thể chuyển đổi các bậc cha mẹ cho xương của bạn giữa hoạt hình và Anime Studio sẽ tự động Keyframe kết quả. Sử dụng công cụ Bone Re-cha mẹ bất cứ lúc nào để thiết lập lại các mẹ hay bỏ liên kết xương hoàn toàn bằng cách nhấp chuột ra khỏi vải.Công cụ & Brushes Enhancements
NEW trong Anime Studio Pro 11 – Chọn công cụ vẽ đã được tăng cường để cung cấp cho bạn kiểm soát nhiều hơn. Giảm số điểm về hình dạng đơn giản, kết hợp nét và hình dạng mịn với công cụ Freehand hoặc pha trộn màu sắc đột quỵ với các Công cụ Color điểm mới. Cải tiến bàn chải mới cung cấp kết quả tìm kiếm linh hoạt hơn và tự nhiên.Cải thiện tập tin Photoshop Hỗ trợ
NEW trong Anime Studio Pro 11 – lớp PSD Bây giờ mới sẽ được áp dụng vào Anime Studio khi tập tin đang hoạt động được cập nhật trong Photoshop. Nếu lớp được sắp xếp lại, Anime Studio sẽ duy trì trật tự lớp riêng nhưng vẫn phản ánh sự thay đổi thị giác làm từ Photoshop.Bone Flipping
NEW trong Anime Studio Pro 11 – Bone lật có thể là rất cần thiết trong giàn nào đó trong Anime Studio. Bây giờ bất cứ xương nào thiết lập có thể được lộn nhiều hơn một lần cho linh hoạt hơn. Khi bạn lật một xương giữa hoạt hình, một keyframe được phép tạo ra các hiệu ứng để thay đổi bất cứ lúc nào.Thông minh Bones Enhancements
NEW trong Anime Studio Pro 11 – Bây giờ khi chuyển đổi một xương một Bone thông minh quay số, Anime Studio sẽ tạo ra hai hành động đó mở rộng đến từng buộc trên xương của bạn, bảo quản các vị trí trung lập. Điều này làm cho làm việc với Smart Bones thậm chí dễ dàng hơn!Màu sắc Point
NEW trong Anime Studio Pro 11 – Các công cụ Color điểm cho phép bạn tạo ra một gradient loại điền cho các đối tượng, dựa vào vị trí điểm.Nhóm với Layer lựa chọn
NEW trong Anime Studio Pro 11 – Bây giờ bạn có thể dễ dàng lớp nhóm sau khi họ đã được tạo ra với Nhóm mới với lựa chọn lớp tùy chọn. Điều này tiết kiệm thời gian và loại bỏ sự cần thiết phải kéo các lớp thành nhóm.Bình thường hóa lớp Scale
NEW trong Anime Studio Pro 11 – độ rộng Matching đột quỵ trên các lớp khác nhau thu nhỏ bây giờ có thể được thực hiện ngay lập tức với các Quy mô lớp bình thường hóa mới. Không tẻ nhạt hơn rescaling cần thiết.Enhancements Timeline
NEW trong Anime Studio Pro 11 – Bây giờ bạn có thể hiển thị và ẩn các kênh truyền hình trên timeline dựa trên sở thích của bạn. Điều này có thể làm giảm sự lộn xộn timeline và giúp bạn tập trung vào các kênh cụ thể để chỉnh sửa và hình ảnh động dễ dàng hơn.Styles Enhancements
NEW trong Anime Studio Pro 11 – Nhiều Styles có thể bây giờ có cùng tên. Anime Studio hiện tham chiếu mỗi phong cách bạn tạo hoặc nhập khẩu với một ID duy nhất giúp bạn tiết kiệm thời gian và rắc rối.Hàng loạt Xuất Enhancements
NEW trong Anime Studio Pro 11 – NEW trong Anime Studio Pro 11 – Các tính năng mới đã được thêm vào bảng xuất hàng loạt để làm cho quá trình dựng hình nhiều tập tin dễ dàng hơn và nhanh hơn. Bây giờ bạn có thể tạo và lưu hồ sơ cho các lô hàng hơn là có một yêu cầu cụ thể cho mỗi tập tin.Các tính năng mới khác
NEW trong Anime Studio Pro 11 – vị trí máy ảnh mặc định bây giờ phản ánh các chức năng của một ống kính 35mm và bảng Properties tại là dễ dàng hơn để di chuyển và thêm một phần cho tổ chức công cụ. Một chức năng xem trước mới cho phép nhanh hơn làm cho việc vô hiệu hóa khử răng cưa trong khi một kịch bản mới cho phép các thế hệ hình dạng hơn. Xem các trục 3D của bạn bây giờ có thể được thực hiện bằng cách truy cập vào menu View.Thu thập thông
NEW trong Anime Studio Pro 11 – Anime Studio 11 doanh nghiệp tổ chức các tập tin nhập khẩu của bạn cho bạn! Tất cả các tập tin của bạn bây giờ được đưa vào một thư mục mới giữ chúng ở một vị trí trung tâm. Một danh sách tập tin văn bản của tài sản của bạn cũng được tạo ra để dễ tham khảo.New File Format
NEW trong Anime Studio Pro 11 – Anime Studio 11 sử dụng một định dạng tập tin JSON mới dựa trên với một phần mở rộng .anime. Đây là một định dạng tập tin hiện đại hơn là cung cấp xử lý nhanh hơn khi làm việc với các tập tin. Khả năng tương thích ngược là có sẵn cho phiên bản 5.Những cải tiến thư viện
French illustrator and animator Emilie Muszczak thrives on bright colors, quirky patterns, and tea. Most of her work begins as a happy mess of doodles, words, and colors in her notebook. See how she created an animated self-portrait using cdvhnghean.edu.vn Photoshop and Animate to represent the way her brain generates the random thoughts that become future projects.
Bạn đang xem: Hướng dẫn sử dụng anime studio pro
Emilie imports a scanned (outline) self-portrait into Photoshop. On a separate layer, she adds circles of yellow, cyan, and orange to the canvas to keep her color palette within easy reach while she uses a Spatter Brush at varying sizes to paint different parts of the portrait.
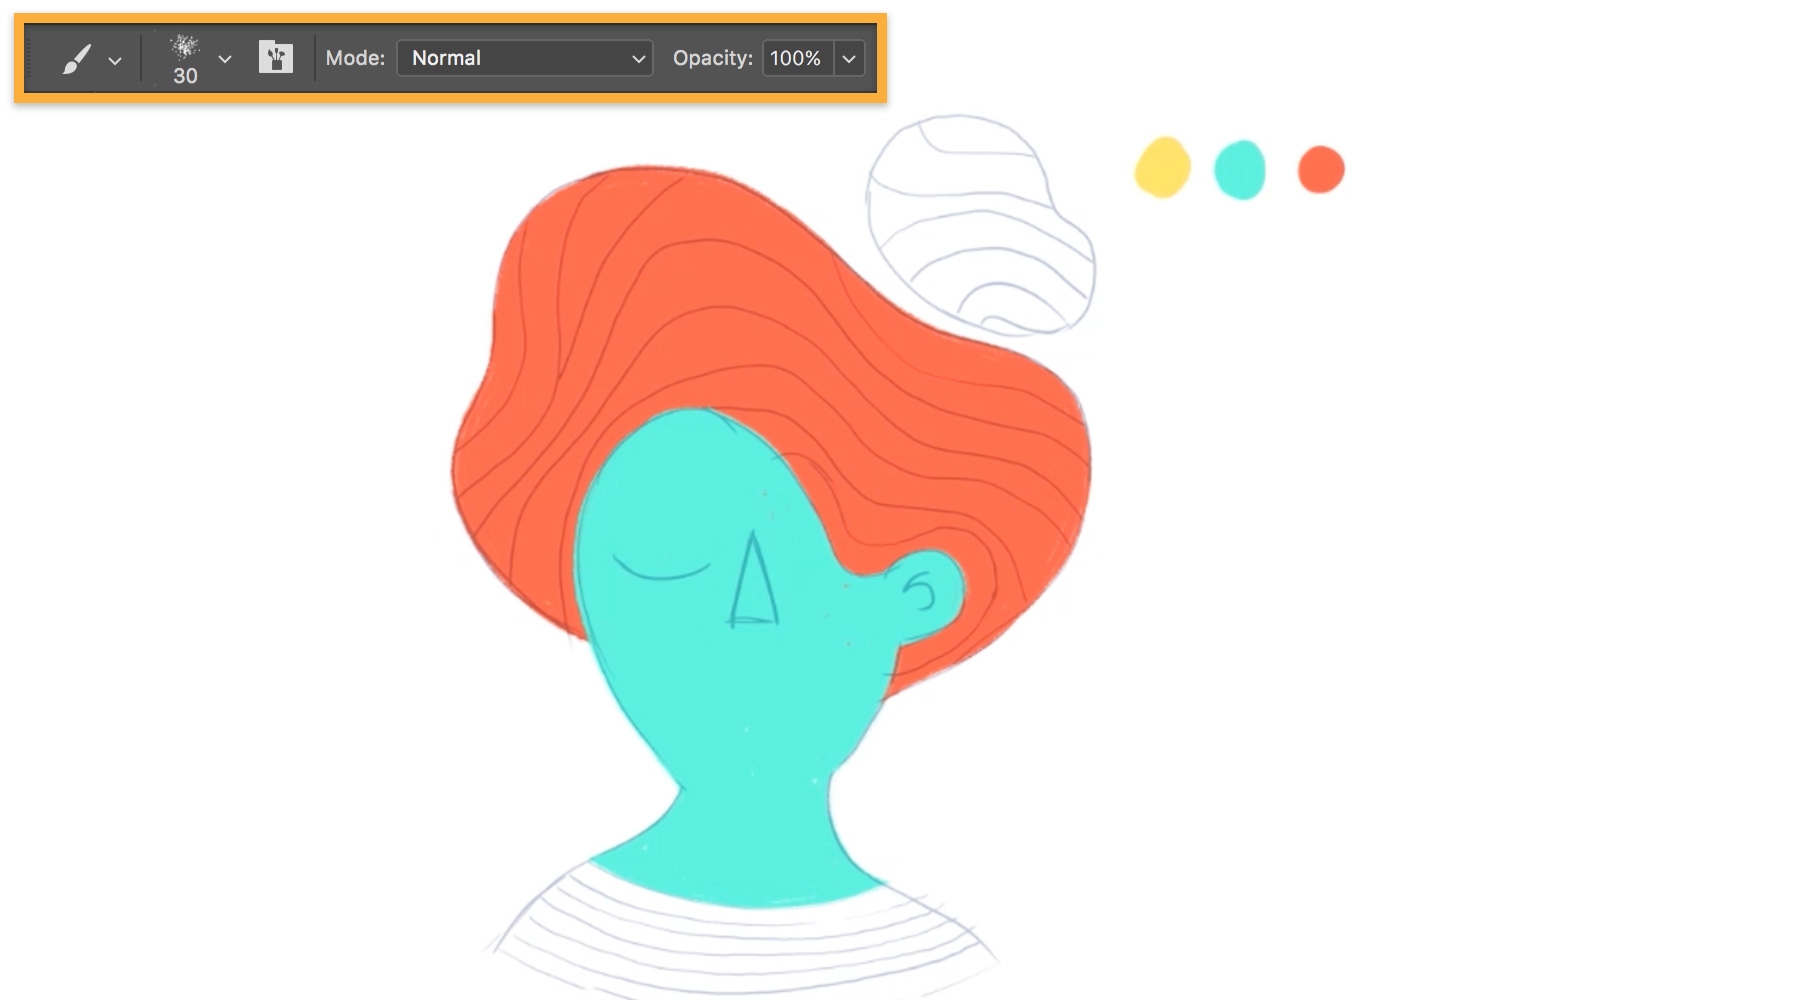
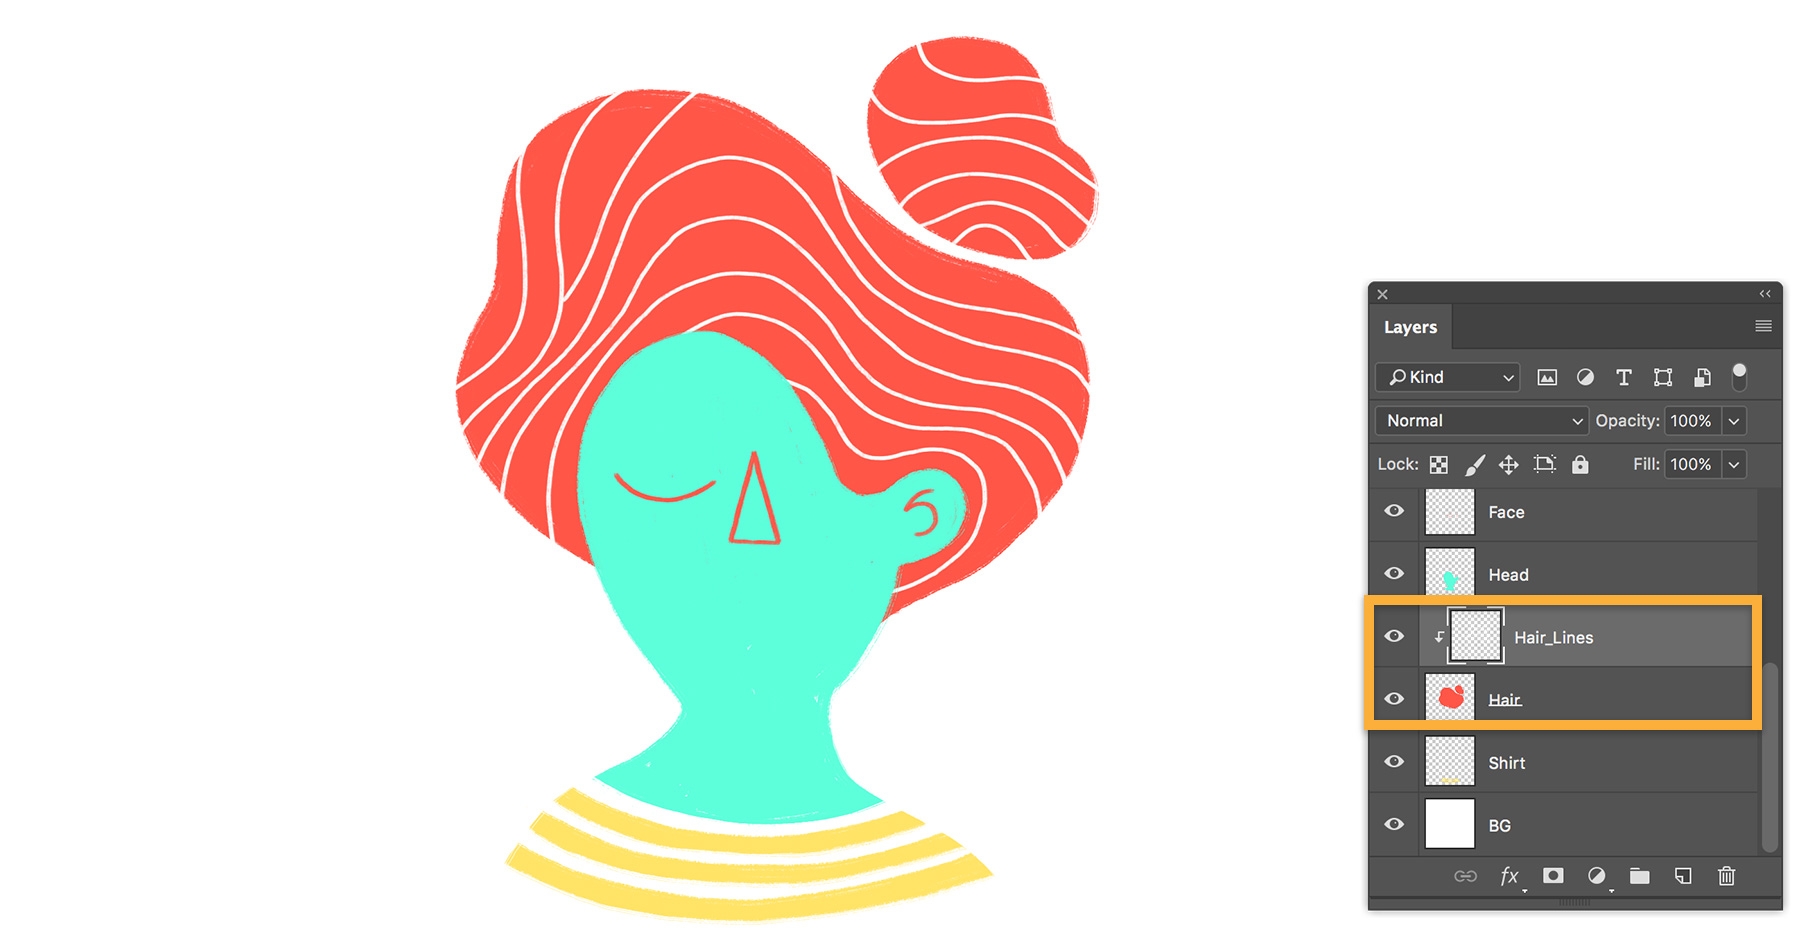
Emilie creates separate layers for the head, hair, face, and shirt, and adjusts her brush size as needed to paint each part. Emilie creates a clipping mask over the hair layer, then paints with a white, narrow brush to trace wavy lines throughout the hair. When she’s done painting, Emilie hides the color palette and sketch layers before saving the image as a JPEG file.
Emilie switches to Animate to create a series of animated bubbles floating up from her head. She creates an HTML5 Canvas document and imports the JPEG of her self-portrait as its own layer on the timeline. Then, she clicks on keyframe 49 in the timeline and inserts a blank keyframe (Insert > Timeline > Blank Keyframe) so the overall animation lasts just under a minute.
Next, Emilie meticulously draws and animates four separate bubble sequences. She creates a new layer for Bubble 1, then uses a thin brush to draw a small arc that starts the formation of the bubble. She adds another blank keyframe so this part of the animation lasts two frames.
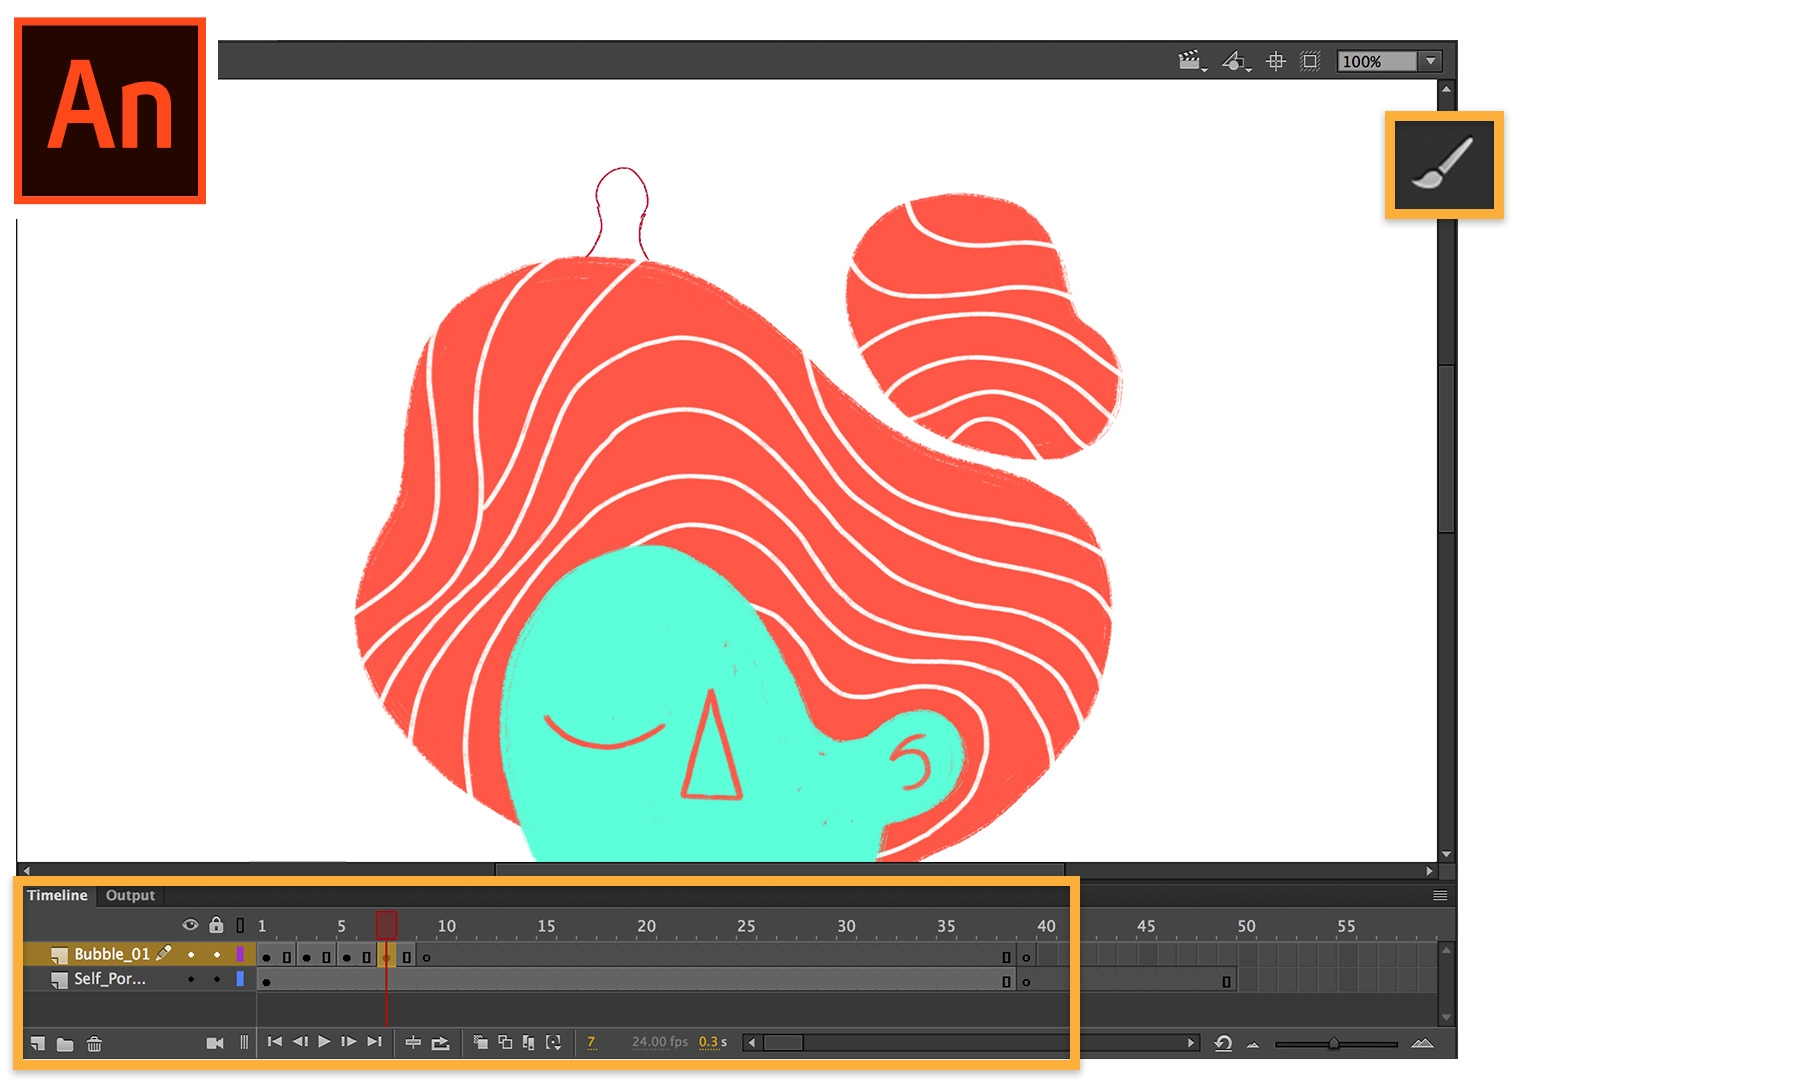
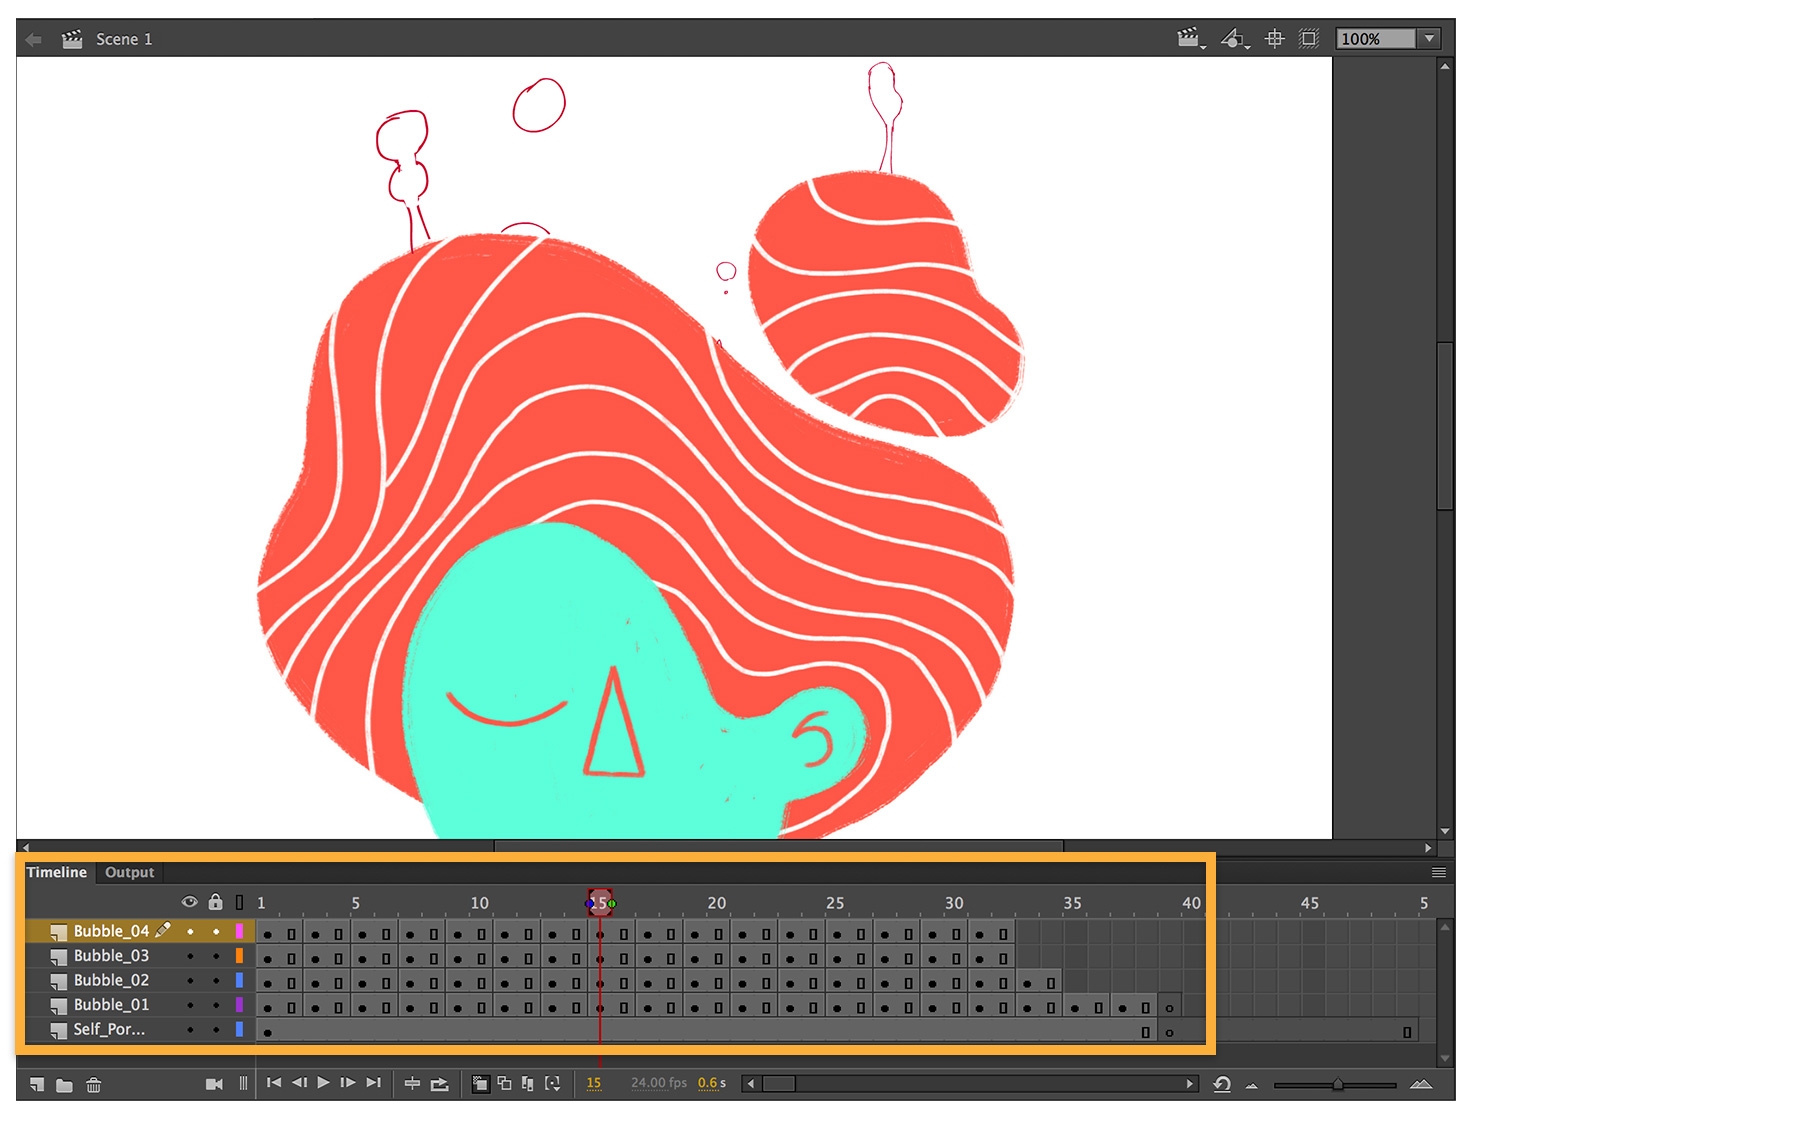
She continues to draw different stages of the bubble forming, reaching its maximum size, breaking away, and then popping. At each stage of the bubble’s lifespan, she sets the animation to last two frames until the animated sequence is complete and the bubble pops. She repeats this process to create three more bubble sequences.
Emilie then exports the sequences so she can finish her work in Photoshop. She exports the Bubble 1 sequence first. To do so, she hides all the layers in the timeline except Bubble 1. Then, she chooses File > Export > Export Movie, selects PNG sequence, and saves the sequence to its own folder on her computer. She repeats this process to create the PNG sequence for the remaining bubble animations.
Back in Photoshop, Emilie finesses the appearance and timing of the bubbles. She imports each bubble sequence she generated from Animate (by choosing File > Open, then selecting Image Sequence from the Options dialog box), and positions it where she wants it in the portrait. Then in the timeline (Windows > Timeline), she moves the sequences around so they start and stop at different times to mimic the random nature of bubbles.
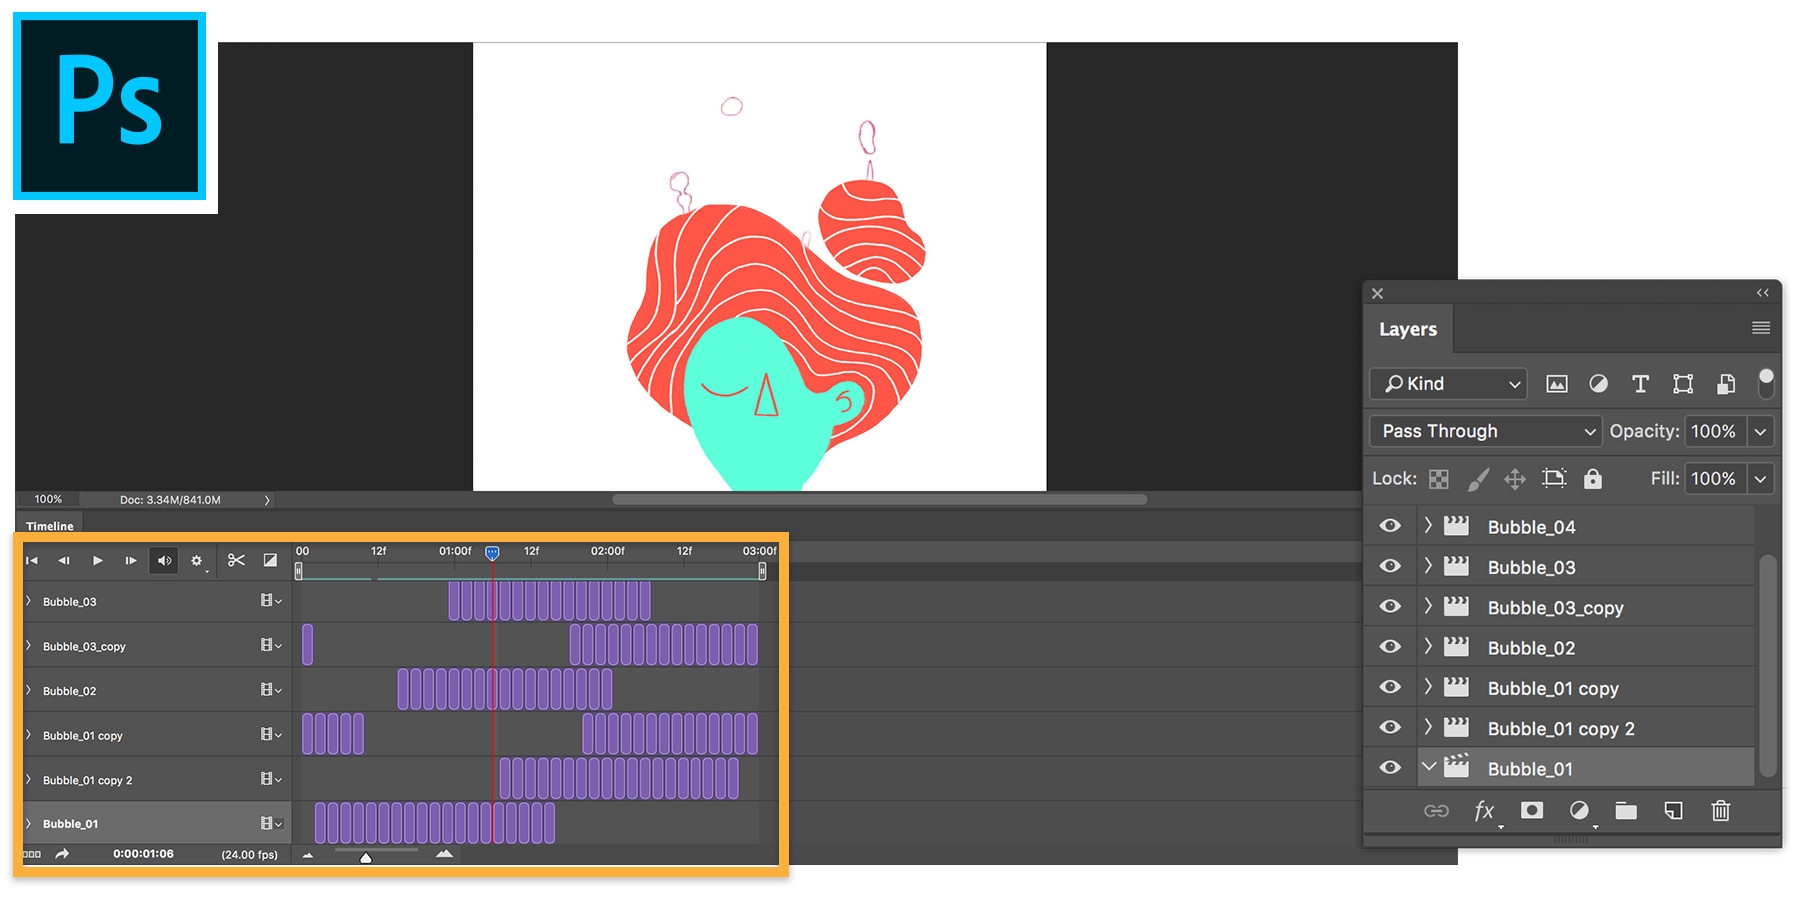
Emilie spends most of her time tracing and filling each stage of the bubble’s lifespan. She starts with the first bubble sequence, adds a layer, and fills the bubble using an orange brush. Then, she moves slightly ahead on the timeline to the next stage of the bubble, adds a layer, and fills the next formation. She repeats this for each formation of the bubble on all four sequences. When she’s done, each bubble stream may require a range of 30–60 layers to complete the sequence, and each layer spans two seconds on the timeline.
Emilie adds subtle animation to the face, head, hair, hair lines, and shirt. Starting with the face, she adds a new layer and traces the facial features. She repeats this process to create four more layers of the face. Since each new layer is drawn with slight variations, the result creates a shimmering, hand-drawn effect when animated.
Emilie then duplicates the five layers of the face within the timeline enough times to fill the length of the animated sequence. Each layer spans two seconds.
Emilie repeats the process for the head, hair, hair lines, and shirt — traces the outline, fills with color, duplicates layers, spans the timeline — so that each part of the portrait has its own animation.
When she’s finished with her portrait, Emilie chooses File > Export > Save for web (legacy), selects GIF, and sets it to loop forever.
About the artist
Emilie Muszczak is inspired by just about every type of art form. She has studied and practiced graphic, spatial, and fashion design. She’s done painting, modeling, sculpting, and life drawing, and has a master’s degree in 3D animation. Growing up in France, Emilie had no shortage of opportunities to be surrounded by art culture and education. But, it also made for a competitive field when she was trying to make a living as an artist. Eventually, she landed a job half a world away, and now works for a design animation studio in Toronto.
In Toronto, she’s in her element. It’s a city of cultures, colors, and tastes, where Emilie discovers new things every day. Emilie starts every project with a cup of tea before brainstorming. Whether at school, at work, on a walk, or almost asleep, Emilie has a sketchbook handy to capture ideas.
Xem thêm:
Emilie does her best work in brightly colored, collaborative environments. When she settles on an idea she likes, she scans her drawing so she can refine it on her computer. She experiments with colors, textures, and patterns, and then spends a lot of time finessing the drawing and animation.